前言
wav文件定义
WAV 文件是以 WAVE 格式保存的音频文件,这是一种用于存储波形数据的标准数字音频文件格式。WAV 文件可能包含具有不同采样率和比特率的音频记录,但通常以 44.1 kHz、16 位、立体声格式保存,这是用于 CD 音频的标准格式。
wav文件结构
以下内容来源于 WAVE PCM soundfile format。
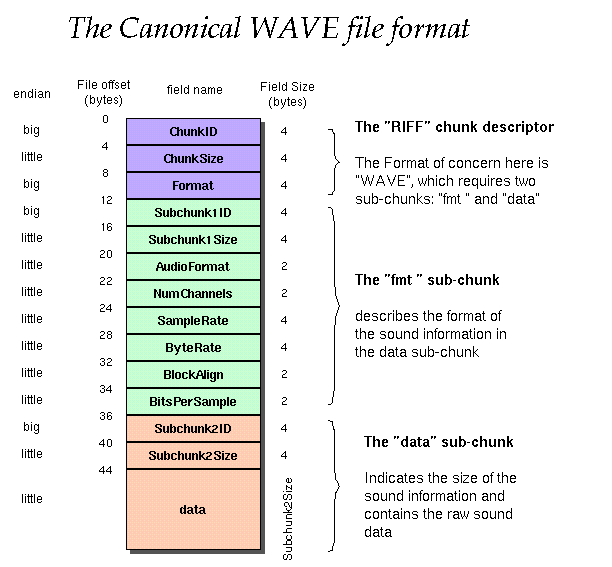
创建的标准 WAVE 格式如下:

文件具体含义如下:

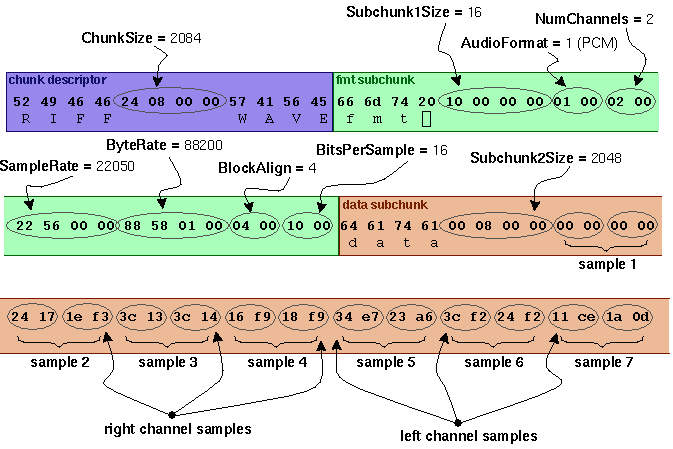
例如,以下是 WAVE 文件的开头 72 个字节,其中字节显示为十六进制数字:
52 49 46 46 46 24 08 00 00 57 41 56 45 66 66 6D 74 20 10 10 00 00 00 00 02 00 02 00 22 00
22 56 00 00 88 58 58 01 0004 00 104 00 10 00 64 61 74 61 74 61 0008 08 00 00 00 00 00 00 00 00 00 00 00 00
24 17 17 24 17 17 24 17 17 00 1e f3 3c 13 3c 14 16 f9 18 f9 34 e7 23 a6 3c f2 24 f2 11 ce 1a 0d

MultipartFile与File
在 Java 中,File 类是 java.io 包中唯一代表磁盘文件本身的对象,也就是说,如果希望在程序中操作文件和目录,则都可以通过 File 类来完成。File 类定义了一些方法来操作文件,如新建、删除、重命名文件和目录等。
File 类不能访问文件内容本身,如果需要访问文件内容本身,则需要使用输入/输出流。
File 类提供了如下三种形式构造方法。
- File(String path):如果 path 是实际存在的路径,则该 File 对象表示的是目录;如果 path 是文件名,则该 File 对象表示的是文件。
- File(String path, String name):path 是路径名,name 是文件名。
- File(File dir, String name):dir 是路径对象,name 是文件名。
File 类位于 java.io 包下,类定义如下所示:
package java.io;
public class File implements Serializable, Comparable<File>
MultipartFile 是 Spring 类型,代表 HTML 中 form data 方式上传的文件,包含二进制数据+文件名称。
MultipartFile 类位于 org.springframework.web.multipart,类定义如下所示:
public interface MultipartFile extends InputStreamSource
Spring MultipartFile转换为File
1、多部分文件#getBytes
MultipartFile multipartFile = new MockMultipartFile("sourceFile.tmp", "Hello World".getBytes());

File file = new File("src/main/resources/targetFile.tmp");

try (OutputStream os = new FileOutputStream(file)) {
    os.write(multipartFile.getBytes());
}

assertThat(FileUtils.readFileToString(new File("src/main/resources/targetFile.tmp"), "UTF-8"))
  .isEqualTo("Hello World");
getBytes()方法对于我们想要在写入磁盘之前对文件执行额外操作的情况很有用,比如计算文件哈希。
2、MultipartFile#getInputStream
MultipartFile multipartFile = new MockMultipartFile("sourceFile.tmp", "Hello World".getBytes());

InputStream initialStream = multipartFile.getInputStream();
byte[] buffer = new byte[initialStream.available()];
initialStream.read(buffer);

File targetFile = new File("src/main/resources/targetFile.tmp");

try (OutputStream outStream = new FileOutputStream(targetFile)) {
    outStream.write(buffer);
}

assertThat(FileUtils.readFileToString(new File("src/main/resources/targetFile.tmp"), "UTF-8"))
  .isEqualTo("Hello World");
这里我们使用 getInputStream()方法获取 InputStream,从 InputStream 读取字节,并将它们存储在 byte[] 缓冲区中。然后我们创建一个 File 和 OutputStream 来写入缓冲区内容。
getInputStream()方法在我们需要将 InputStream包装在另一个 InputStream 中的情况下很有用,例如,如果上传的文件被 gzip 压缩,则为 GZipInputStream 。
3、多部分文件#transferTo
MultipartFile multipartFile = new MockMultipartFile("sourceFile.tmp", "Hello World".getBytes());

File file = new File("src/main/resources/targetFile.tmp");

multipartFile.transferTo(file);

assertThat(FileUtils.readFileToString(new File("src/main/resources/targetFile.tmp"), "UTF-8"))
  .isEqualTo("Hello World");
使用 transferTo()方法,我们只需创建要写入字节的文件,然后将该文件传递给 transferTo ()方法。
当只需要将 MultipartFile 写入 File 时,transferTo()方法很有用。
RandomAccessFile

- RandomAccessFile 用于在文件的任意位置读写数据,并且不会消耗太多的内存。
- RandomAccessFile 虽然属于
java.io下的类,但它不是 InputStream 或者 OutputStream 的子类;它也不同于 FileInputStream 和 FileOutputStream。 FileInputStream 只能对文件进行读操作,而 FileOutputStream 只能对文件进行写操作。 - RandomAccessFile 与输入流和输出流不同之处就是 RandomAccessFile 可以访问文件的任意地方同时支持文件的读和写,并且它通过 seek 方法实现在文件的任意位置读写访问。
- RandomAccessFile 包含 InputStream 的三个 read 方法,也包含 OutputStream 的三个 write 方法。同时 RandomAccessFile 还包含一系列的 readXxx 和 writeXxx 方法完成输入输出。
关键方法
1、创建对象
//只读
RandomAccessFile raf = new RandomAccessFile(文件,"r");
//读写
RandomAccessFile raf = new RandomAccessFile(文件,"rw");
2、通过 seek 方法设置开始随机读写文件的位置,以字节为单位。
try (RandomAccessFile rdf = new RandomAccessFile(file, "r")) {
  int pos = 22;
  int length = 2;
  rdf.seek(pos);
  result = new byte[length];
  for (int i = 0; i < length; i++) {
    result[i] = rdf.readByte();
  }
}

file.deleteOnExit();
关于 RandomAccessFile 的更多知识讲解,推荐阅读 详解 RandomAccessFile 的使用以及使用场景分析
Jaudiotagger
Jaudiotagger 是用于标记音频文件中数据的音频标记库。它目前完全支持 Mp3、Mp4(Mp4 音频、M4a 和 M4p 音频)Ogg Vorbis、Flac 和 Wma,对 Wav 和 Real 格式的支持有限。
当下我们可以利用 Jaudiotagger 来获取音频文件的基本信息。
1、首先引入依赖
<dependency>
  <groupId>org</groupId>
  <artifactId>jaudiotagger</artifactId>
  <version>2.0.3</version>
</dependency>
2、核心方法
public void transferAudio(File file) {
  AudioFile audioFile;
  audioFile = new WavFileReader().read(file);
  if (Objects.isNull(audioFile)) {
    return;
  }
  AudioHeader audioHeader = audioFile.getAudioHeader();

  System.out.println("audio format: " + audioHeader.getFormat()); // 音频格式,1-PCM

  System.out.println("num channels: " + audioHeader.getChannels()); // 1-单声道;2-双声道

  System.out.println("sample rate: " + audioHeader.getSampleRate()); // 采样率、音频采样级别

  System.out.println("byte rate: " + audioHeader.getBitRate()); // 每秒波形的数据量

  System.out.println("block align: "); // 采样帧的大小

  System.out.println("音频时长:" + audioHeader.getTrackLength()); //单位为s
}
执行结果如下:
audio format: WAV-RIFF 16 bits
num channels: 1
sample rate: 48000
byte rate: 768
block align:
音频时长:3
除了解析 Wav 文件,还可以解析 flac、mp3 等文件,如下图所示,该工具包中有其他音频格式的封装处理类。

相比于使用 RandomAccessFile 方式更加友好,不过两者可获取的基本属性稍有差异。
实操
介绍了那么多,又是 WAVE 文件结构,又是三种文件类,接下来我们进入正题,将获取 WAVE 文件的 header 信息,包括声道数、文件大小、采样率等等。
想要读取 WAVE 文件的 header 信息,常用的 File 类是无法实现的,在得知 WAVE 文件结构的前提下,我们选用 RandomAccessFile 类按字节来读取数据。因为 SpringBoot 接收的文件类型为 MultipartFile,而创建 RandomAccessFile 对象需要 File 对象,所以又涉及到 MultipartFile 转换为 File 的操作。
关于 Jaudiotagger 的示例就不演示了,稍微修改一下就完事了。
示例
这里沿用之前文章中的项目,只需稍作修改。
1、controller 层,接收 WAVE 文件。
@PostMapping("/picture")
public void uploadPicture(@RequestPart(value = "multipartFile") MultipartFile multipartFile) {
  userService.uploadPicture(multipartFile);
}
2、FileUtil 工具类,主要处理 MultipartFile 到 File 的转换,以及文件的复制。
public static File multipartFileToFile(MultipartFile multiFile) throws IOException {
  String fileName = multiFile.getOriginalFilename();
  assert fileName != null;
  String[] fileNameArr = fileName.split("\\.");

  // 根据multiFile的文件名创建一个临时File文件,暂无数据
  File file = File.createTempFile(fileNameArr[0] + "_temp", fileNameArr[1]);
  copyFileUsingFileChannels(multiFile, file);
  return file;
}

// 使用FileChannel来将MultipartFile的数据复制到File文件中
public static void copyFileUsingFileChannels(MultipartFile source, File dest) throws IOException {
  FileInputStream inputStream = (FileInputStream) source.getInputStream();
  FileChannel inputChannel = inputStream.getChannel();
  FileChannel outputChannel;
  try (FileOutputStream outputStream = new FileOutputStream(dest)) {
    outputChannel = outputStream.getChannel();
    outputChannel.transferFrom(inputChannel, 0, inputChannel.size());
    inputChannel.close();
    outputChannel.close();
  }
}
File 类的 createTempFile()方法会在默认临时文件目录中创建一个空文件,使用给定前缀和后缀生成其名称。临时文件能够使用默认路径,可以避免存在创建文件是因为路径错误导致创建文件失败的问题。 如果需求中需要创建一个临时文件,这个临时文件可能作为存储使用,但在程序运行结束后需要删除文件,可以使用 deleteOnExit()方法。注意,deleteOnExit 是程序退出虚拟机时才会删除。
可能你对于 FileUtil 中的 copyFileUsingFileChannels()方法有些疑惑,为什么这里要复制数据,以及为什么不直接使用 MultipartFile 的 transferTo()方法?
我们尝试直接使用 transferTo()方法,不再使用 copyFileUsingFileChannels()方法,看看执行结果如何?
  public static File multipartFileToFile(MultipartFile multipartFile) throws IOException {
    String fileName = multipartFile.getOriginalFilename();
    assert fileName != null;
    String[] fileNameArr = fileName.split("\\.");

    File file = File.createTempFile(fileNameArr[0] + "_temp", "." + fileNameArr[1]);
    multipartFile.transferTo(file);

//    copyFileUsingFileChannels(multiFile, file);
    return file;
  }
执行正常流程后,发现控制台报错了,错误信息如下:
java.io.FileNotFoundException: /private/var/folders/fw/yn74xzcx70n0vw9yzyw528540000gn/T/tomcat.3075802565760283748.8081/work/Tomcat/localhost/ROOT/upload_d35d47f6_843a_4e39_83a3_92d66506b025_00000004.tmp (No such file or directory)
根据错误可知,找不到 MultipartFile 文件才导致报错,这是为什么呢?我们只是换用了 transferTo()方法,接下来我们 debug 调试一下,看看 transferTo()到底做了什么。
深入代码调用后,发现问题出在了 DiskFileItem 文件中的 write()方法,该方法中会调用 File 类的 renameTo()方法。
public boolean renameTo(File dest) {
  SecurityManager security = System.getSecurityManager();
  if (security != null) {
    security.checkWrite(path);
    security.checkWrite(dest.path);
  }
  if (dest == null) {
    throw new NullPointerException();
  }
  if (this.isInvalid() || dest.isInvalid()) {
    return false;
  }
  return fs.rename(this, dest);
}
继续往下挖掘:
//UnixFileSystem的实现
public boolean rename(File f1, File f2) {
  //清除路径解析的缓存
  cache.clear();
  javaHomePrefixCache.clear();
  return rename0(f1, f2);
}
private native boolean rename0(File f1, File f2);
涉及到本地方法,就不继续往下看了,这块代码核心逻辑是:调用 rename0()方法,是将 f1 文件移动并重命名,即 f2,所以 f1 文件就不存在了。
我们还可以用一个简单的案例来测试一下:
public static void main(String[] args) throws IOException {
  String imgPath = "xxx";
  String newImgPath = "xxxx";

  File file = new File(imgPath);
  File file2 = new File(newImgPath);
  file.renameTo(file2);

  FileInputStream inputStream = new FileInputStream(file);
}
执行上述代码会输出如下内容:
Exception in thread "main" java.io.FileNotFoundException: src/main/resources/static/icon.png (No such file or directory)
综上所述,我们没有使用 transferTo()方法,而是使用 FileChannel 来将 MultipartFile 的数据复制到 File 文件中。
关于上述报错,还有一种情况,即创建 File 对象时使用了相对路径,感兴趣的朋友可以阅读《SpringBoot文件上传丢失的采坑经历》
3、service 层,创建 RandomAccessFile 对象,按字节来读取 WAVE 文件 header 信息。
@SneakyThrows
public void uploadPicture(MultipartFile multipartFile) {
  File file = FileUtil.multipartFileToFile(multipartFile);
  RandomAccessFile rdf = new RandomAccessFile(file, "r");

  System.out.println("audio size: " + getAudioSize(rdf)); // 音频文件大小

  System.out.println("audio format: " + getAudioFormat(rdf)); // 音频格式,1-PCM

  System.out.println("num channels: " + getAudioChannelCount(rdf)); // 1-单声道;2-双声道

  System.out.println("sample rate: " + getAudioSampleRate(rdf)); // 采样率、音频采样级别

  System.out.println("byte rate: " + getByteRate(rdf)); // 每秒波形的数据量

  System.out.println("block align: " + getBlockAlign(rdf)); // 采样帧的大小

  System.out.println("bits per sample: " + getBitsPerSample(rdf)); // 采样位数

  rdf.close();
  file.deleteOnExit();

  // 假设上传的文件还有其他用处
}

private short getAudioChannelCount(RandomAccessFile rdf) throws IOException {
  return toShort(read(rdf, 22, 2));
}

private int getAudioSize(RandomAccessFile rdf) throws IOException {
  return toInt(read(rdf, 4, 4));
}

private int getAudioFormat(RandomAccessFile rdf) throws IOException {
  return toShort(read(rdf, 20, 2));
}

private int getAudioSampleRate(RandomAccessFile rdf) throws IOException {
  return toInt(read(rdf, 24, 4));
}

private int getByteRate(RandomAccessFile rdf) throws IOException {
  return toInt(read(rdf, 28, 4));
}

private int getBlockAlign(RandomAccessFile rdf) throws IOException {
  return toShort(read(rdf, 32, 2));
}

private int getBitsPerSample(RandomAccessFile rdf) throws IOException {
  return toShort(read(rdf, 34, 2));
}

private int toInt(byte[] b) {
  return (b[3] << 24) + (b[2] << 16) + (b[1] << 8) + b[0];
}

private short toShort(byte[] b) {
  return (short) ((b[1] << 8) + b[0]);
}

private byte[] read(RandomAccessFile rdf, int pos, int length) throws IOException {
  rdf.seek(pos);
  byte result[] = new byte[length];
  for (int i = 0; i < length; i++) {
    result[i] = rdf.readByte();
  }
  return result;
}
根据代码可知,想要读取 WAVE 文件的某一属性,指定开始读取的偏移量,然后再划好长度,就可以获取对应的十六进制数,再转换为十进制即可。
执行结果如下:
audio size: 272150
audio format: 1
num channels: 1
sample rate: -17792
byte rate: 96000
block align: 2
bits per sample: 16
参考文献
本文作者为hresh,转载请注明。